Introduction:
Setting up a TV in your home doesn’t have to be complicated. With the right tools and a bit of preparation, you can easily handle the installation process on your own. Whether you prefer mounting your TV on the wall for a sleek, minimalist appearance or placing it on a stand for easy adjustments, we’ve got you covered. In this guide, we will walk you through each step, starting from selecting the ideal spot to connecting your TV and managing cables. By the end of this guide, you’ll have your TV set up and ready to deliver an outstanding viewing experience. So, let’s dive in!
1. Choose the Right Location for Your TV
The first step is deciding where to install your TV. First, consider the following:
- Viewing Angle: Ensure the TV is at eye level when seated. Ideally, the center of the screen should be aligned with the viewer’s eye level.
- Room Layout: Think about how the TV will fit into the space and the positioning of your furniture. Also, avoid placing the TV in spots where glare from windows or lights could affect the viewing experience.
- Power Outlet: Next, ensure there is a nearby accessible power outlet. If not, you may need an extension cord or to add a new outlet.
- Wall Space for Mounting: If you plan to mount the TV, make sure there’s enough space and that the wall is solid enough to support the TV’s weight.
2. Gather the Necessary Tools and Materials
The tools you need depend on whether you’re wall-mounting or using a stand. Here’s what you’ll need for both options:
- Wall Mounting:
- TV mount (make sure it’s compatible with your TV’s size and VESA pattern)
- Stud finder (to locate wall studs)
- Power drill and bits (for drilling holes)
- Level (to ensure the mount is straight)
- Screwdriver (for tightening screws)
- Measuring tape (for accurate measurements)
- Pencil (for marking drill holes)
- Wall anchors (if mounting on drywall without studs)
- TV Stand Setup:
- TV stand or entertainment center
- Screws and assembly tools (usually included with the stand)
- Level (to ensure the TV is upright and centered)
- Rubber pads or anti-tip straps (optional, for added security)
3. Mounting the TV on the Wall
- Step 1: Locate the Wall Studs
First, use a stud finder to locate the studs behind the wall. These studs provide the support needed to hold the TV securely. Once you find the studs, mark the spots with a pencil, ensuring the height aligns with the TV’s center. - Step 2: Attach the TV Mount to the Wall
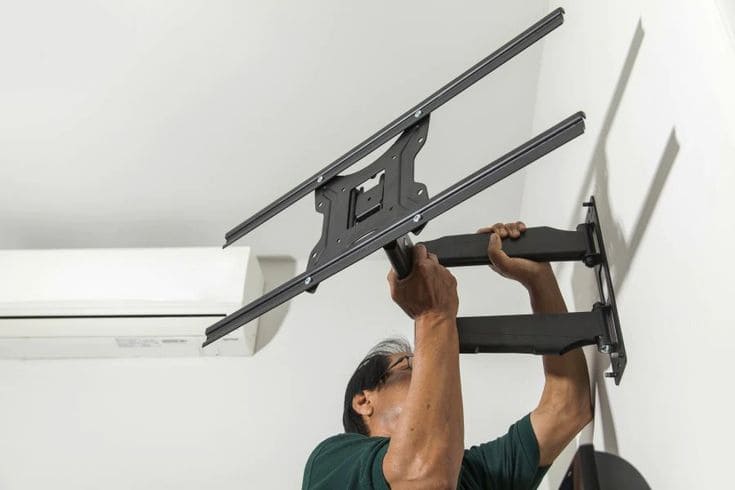
Next, position the TV mount against the wall, ensuring the mounting holes align with the studs. Use a level to check that the mount is straight. Then, drill pilot holes at the marked spots and secure the mount with screws or bolts. Be careful not to overtighten and damage the wall. - Step 3: Attach the TV Brackets to the Back of the TV
Now, align the mounting brackets with the VESA holes on the back of the TV and attach them with the provided screws. Tighten the screws carefully, avoiding overtightening to prevent damage. - Step 4: Mount the TV on the Wall
Finally, lift the TV and hang it onto the mounted bracket. Ensure the TV is securely locked into place, following the manufacturer’s instructions. Test its stability by gently pulling on the TV to ensure it doesn’t wobble.
4. Setting Up the TV on a Stand
If you’re not wall-mounting the TV, you’ll need to place it on a stand or entertainment center.
- Step 1: Assemble the TV Stand
Follow the assembly instructions that come with the TV stand. Make sure the stand is sturdy enough to support the TV’s weight. - Step 2: Place the TV on the Stand
Carefully lift the TV and place it on the stand. Ensure it’s centered and balanced. Check the stability to confirm that the TV is firmly placed. Optionally, you may use rubber pads or anti-tip straps for extra security, especially in homes with children or pets.
5. Connect the TV to Power and Other Devices
Once the TV is securely mounted or placed, it’s time to connect it to power and devices.
- First, plug the TV into a nearby power outlet. If necessary, use a power strip or extension cord to reach the outlet.
- Then, connect additional devices, such as cable boxes, gaming consoles, or soundbars, using HDMI, AV, or optical cables.
- For smart TVs, next, connect the TV to your Wi-Fi network by following the on-screen instructions. If needed, sign in to streaming services like Netflix or Hulu.
6. Adjust the TV Settings
Once everything is connected:
- First, turn on the TV and follow the on-screen instructions to adjust settings such as language and picture quality.
- Then, adjust the TV settings for optimal brightness, contrast, color, and sharpness.
- Finally, check the sound settings to ensure audio clarity and proper balance. You can connect external speakers or a soundbar if desired.
7. Conceal the Wires (Optional)
For a cleaner look, consider hiding the wires:
- First, use a cable management system to hide cables behind the wall or under furniture.
- If wall-mounting, then install a cable cover or an in-wall cable management system.
- Alternatively, you can use decorative cable covers along the baseboard for a sleek appearance.
8. Perform Final Checks
Before finishing up:
- First, check the TV’s stability by gently shaking it to ensure it’s securely mounted or placed.
- Then, test all connected devices to confirm they’re working correctly.
- Finally, verify that the remote control is functioning and the TV responds to commands.
Conclusion:
By following these steps, you can successfully install your TV inside your home. Whether you mount it on the wall or place it on a stand, the process is straightforward as long as you plan carefully and follow safety guidelines. Enjoy your newly installed TV, and ensure it’s securely placed for long-lasting performance!