Giving your house doors a fresh coat of paint is a simple yet effective way to enhance your home’s appearance while protecting the surface from daily wear and tear. Whether you’re painting an interior or exterior door, following a structured process will help you achieve a smooth and professional finish. To make things easier, this detailed guide will walk you through each step, ensuring a flawless result.

Materials & Tools You’ll Need
Before you begin, it’s essential to gather all the necessary supplies to avoid interruptions during the process.
Paint & Primer:
✔ Paint Type: Depending on your door material, you can choose between latex (water-based) or oil-based paint.
✔ Finish: It’s best to use semi-gloss or satin since they are durable and easy to clean.
✔ Primer: If your door is unfinished, stained, or has a dark color, applying a bonding primer is recommended.
Essential Tools:
✔ Paintbrush (2-inch angled brush for edges and details)
✔ Foam roller (for a smooth and even finish on flat surfaces)
✔ Sandpaper (120- to 220-grit for smoothing imperfections)
✔ Painter’s tape (to protect areas you don’t want painted)
✔ Screwdriver (for removing door hardware)
✔ Cleaning supplies (mild soap, water, or a degreaser for dirt removal)
✔ Drop cloths or plastic sheets (to prevent paint from getting on floors)
Step 1: Select the Right Paint
To achieve the best results, it’s important to choose the right type of paint for your door.
1.1 Choose Paint Based on Door Type
- Interior Doors: Latex paint with a semi-gloss or satin finish works best.
- Exterior Doors: It’s recommended to use acrylic-latex or oil-based weather-resistant paint.
- Wooden Doors: If the door is unpainted, applying a wood primer first will help with adhesion.
- Metal Doors: To prevent rust and ensure better coverage, a metal primer is necessary.
1.2 Pick the Best Paint Finish
- Flat/Matte: Although it hides imperfections well, it’s not ideal for doors since it’s difficult to clean.
- Eggshell/Satin: This finish is a good choice for low-traffic interior doors.
- Semi-Gloss: A popular option because it is durable and easy to maintain.
- Gloss: While highly durable, it tends to highlight imperfections more than other finishes.
Step 2: Prepare the Door for Painting
Proper preparation is crucial to ensure that the paint adheres well and lasts a long time.
2.1 Remove the Door (Optional but Recommended)
- First, use a screwdriver to take the door off its hinges and place it on a flat surface.
- However, if you prefer to paint the door while it’s still hanging, use painter’s tape to protect surrounding areas.
2.2 Take Off or Cover Hardware
- Next, remove doorknobs, locks, and hinges to avoid getting paint on them.
- If removing the hardware isn’t an option, simply cover it with painter’s tape for protection.
2.3 Clean the Surface Thoroughly
- Before sanding, wash the door with soap and water to remove any dirt or grease.
- If the surface has stubborn stains, using a degreaser is a good idea.
- Finally, allow the door to dry completely before moving on to the next step.
2.4 Smooth the Surface by Sanding
- Once the door is dry, use 120- to 220-grit sandpaper to eliminate rough patches and imperfections.
- After sanding, wipe off any dust with a damp cloth or tack cloth to ensure a clean surface.
Step 3: Apply Primer (If Necessary)
Although applying primer isn’t always required, it can significantly improve the durability and look of the final coat.
3.1 When to Use a Primer
✅ The door is unpainted or made of bare wood.
✅ You’re painting over a dark or glossy surface.
✅ There are visible stains or discoloration.
✅ You’re switching from oil-based to latex paint.
3.2 How to Apply Primer
- First, stir the primer well to ensure even consistency.
- Next, use a brush for detailed areas and a roller for large, flat sections.
- Apply a thin, even coat and allow it to dry for 1–4 hours before moving on to painting.
Step 4: Start Painting the Door
Now that the surface is properly prepped, it’s time to start painting.
4.1 Brush vs. Roller – Which One to Use?
- Brush: Ideal for painting edges and detailed areas.
- Foam Roller: Provides a smooth, streak-free finish on flat surfaces.
- Paint Sprayer: Can create an even coat, but requires extra prep and masking.
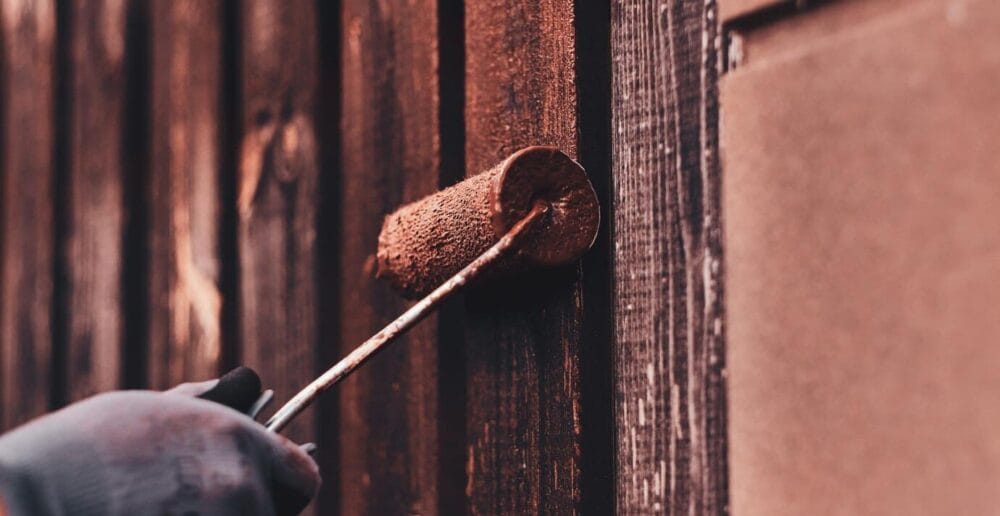
4.2 Painting Process
4.2.1 For Doors with Panels:
- Begin by painting the recessed sections and detailed areas using a brush.
- Then, use a foam roller for raised panels and flat surfaces.
- Be sure to apply paint in long, even strokes to avoid streaks.
4.2.2 For Flat Doors:
- Start by using a foam roller for smooth application.
- A brush can be used for edges and tight corners.
- Apply thin layers instead of thick coats to prevent drips.
4.3 Allow Proper Drying Time
- For best results, allow the first coat to dry for 2–4 hours before applying a second coat.
- To achieve a flawless finish, lightly sand between coats.
4.4 Apply a Second Coat if Needed
- In most cases, two coats of paint are necessary for full coverage.
- Let the final coat dry completely before handling the door.
Step 5: Reassemble and Finish Up
5.1 Let the Paint Cure
- After painting, it’s important to let the door dry for at least 24 hours before reinstalling hardware.
- Additionally, avoid closing the door completely for 48 hours to prevent it from sticking.
5.2 Reattach Hardware & Hinges
- Once the paint is fully dry, carefully reinstall doorknobs, locks, and hinges.
- Lastly, inspect the door and touch up any minor imperfections if necessary.
Pro Tips for a Professional Finish
✔ Choose a dust-free workspace to avoid imperfections.
✔ Paint in a well-ventilated area to speed up drying.
✔ Use high-quality brushes and rollers for the best results.
✔ Avoid closing the door until the paint has fully cured (which may take several days).
✔ For exterior doors, consider applying a protective sealant for extra durability.
Common Painting Mistakes to Avoid
🚫 Skipping sanding – Can lead to a rough finish and poor adhesion.
🚫 Applying thick layers of paint – May result in drips and uneven coverage.
🚫 Not allowing enough drying time between coats – Can cause peeling or streaks.
🚫 Painting in extreme temperatures – Affects drying time and overall appearance.
🚫 Neglecting to remove dust after sanding – Can create bumps in the finish.
Final Thoughts
By following this step-by-step guide, you can achieve a smooth, durable, and professional-looking finish on your doors. Whether you’re refreshing an old door or adding a new splash of color, taking the time to prepare and paint properly will make all the difference.